Creating Oracle database that uses Raw Device option for Storing database files (For RHEL 4 / 3 / 2.1/ CentOS 4 / 3 / 2)
Friday, February 7, 2014
Raw Devices are disk partitions or logical volumes that have not been formatted with file system. When you use raw devices for database file storage, Oracle writes data directly to the partition or volume, bypassing the operating system file layer. For this reason, you can sometimes achieve performance gains by using raw devices. However, because raw devices can be difficult to create and administer, and because the performance gains over the modern are minimal, Oracle recommends that you choose Automatic Storage Management (ASM) or file system storage in preference to raw devices.
Tasks covered:
Partitioning Disk:
Creating Volumes and the Volume Group:
Binding Volumes to Raw devices
Creating dbca raw device mapping file
Linking Raw device to the physical filenameUpdating .bash_profile file. for oracle.
Creatying database manuall\y without dbca:
Creating Volumes and the Volume Group:
Binding Volumes to Raw devices
Creating dbca raw device mapping file
Linking Raw device to the physical filenameUpdating .bash_profile file. for oracle.
Creatying database manuall\y without dbca:
Please goto "creating paritions" to create the partitions. It is preferable to use single-whole disk partition (e.g /dev/sda)
instead of multi-partitioned disk (e.g, /dev/sda3)
instead of multi-partitioned disk (e.g, /dev/sda3)
The partition table looks like below. I have used /dev/sda3 partition where Logival Volumes will be created using LVM
(Logical Volume Manager).
(Logical Volume Manager).
- [root@shree root]# fdisk -l
Disk /dev/sda: 122.9 GB, 122942324736 bytes
255 heads, 63 sectors/track, 14946 cylinders
Units = cylinders of 16065 * 512 = 8225280 bytes
Device Boot Start End Blocks Id System
/dev/sda1 1 3648 29302528+ 83 Linux
/dev/sda3 4866 7905 24418800 83 Linux
/dev/sda4 7906 14946 56556832+ 83 Linux
Disk /dev/hda: 60.0 GB, 60022480896 bytes
255 heads, 63 sectors/track, 7297 cylinders
Units = cylinders of 16065 * 512 = 8225280 bytes
Device Boot Start End Blocks Id System
/dev/hda1 * 1 1567 12586896 83 Linux
/dev/hda2 1568 1632 522112+ 83 Linux
/dev/hda3 1633 2154 4192965 82 Linux swap
/dev/hda4 2155 7297 41311147+ 5 Extended
/dev/hda5 2155 7297 41311116 83 Linux
Disk /dev/hdb: 122.9 GB, 122942324736 bytes
255 heads, 63 sectors/track, 14946 cylinders
Units = cylinders of 16065 * 512 = 8225280 bytes
Device Boot Start End Blocks Id System
/dev/hdb1 * 1 1217 9775521 83 Linux
/dev/hdb2 1218 6081 39070080 83 Linux
/dev/hdb3 6082 10945 39070080 83 Linux
/dev/hdb4 10946 14946 32138032+ 83 Linux
[root@shree root]#
we need to stamp the raw disk or partition (In our example /dev/sda3) to be recognised as Volume Group disk.
We execute the pvcreate command as root to stamp the disk.
We execute the pvcreate command as root to stamp the disk.
[root@shree ~]# pvcreate -d /dev/sda3
Then we need to create a volume group oracle_vg on top of the stamped disk (/dev/sda3). The below comamd will allow
128 logical and 128 physical partitions with the extent size of 512 KB.
128 logical and 128 physical partitions with the extent size of 512 KB.
[root@shree ~]# vgcreate -l 128 -p 128 -s 512k oracle_vg /dev/sda3
Under this Volume Group (oracle_vg), we will create logical volumes one for each tablespaces, redolog files and control files.
The naming convention for the logical volumes should be dbname_objectname_raw_sizem. In our example the dbname is test and so
the logical volume name for the tablespace (object) SYSTEM of size 500M is test_system_raw_500m. Oracle recommends to create
the following number of logical volumes of mentioned size for each objects.
| Number | Partition Size (MB) | Purpose |
|---|---|---|
| 1 | 500 | SYSTEM tablespace |
| 1 | 500 | SYSAUX tablespace |
| 1 | 500 | UNDOTBS1 tablespace |
| 1 | 250 | TEMP tablespace |
| 1 | 160 | EXAMPLE tablespace |
| 1 | 120 | USERS tablespace |
| 3 | 120 | Three online redo log files |
| 3 | 110 | First and third control files |
| 1 | 5 | Server parameter file (SPFILE) |
| 1 | 5 | Password file |
Execute the below command as root to create n number of logical volumes by executing the same command n number of times.
This will create n logical volumes named oracle_vg/lvol1 through oracle_vg/lvoln. Make sure that you change the size of logical
volume to match the appropriate file size. I executed
This will create n logical volumes named oracle_vg/lvol1 through oracle_vg/lvoln. Make sure that you change the size of logical
volume to match the appropriate file size. I executed
lvcreate -L sizem logical_grp_name
Where sizem represents the size of the volume in MB and
logical_grp_name represents the group name where this volume is created.
I have run this command 14 times to create 14 volumes for our test database files.
lvcreate -L 520m oracle_vg
lvcreate -L 520m oracle_vg
lvcreate -L 270m oracle_vg
lvcreate -L 170m oracle_vg
lvcreate -L 130m oracle_vg
lvcreate -L 130m oracle_vg
lvcreate -L 130m oracle_vg
lvcreate -L 130m oracle_vg
lvcreate -L 130m oracle_vg
lvcreate -L 130m oracle_vg
lvcreate -L 130m oracle_vg
lvcreate -L 8m oracle_vg
lvcreate -L 8m oracle_vglvcreate -L 520m oracle_vg
Run lvscan as root to get the information on volumes.
I have added the below lines into the /etc/sysconfig/rawdevices and restarted the rawdevices service to bind logical volumes
created in the above steps.
/usr/bin/raw /dev/raw/raw11 oracle_vg/lvol0    # test db -- SYSAUX Tablespace
/usr/bin/raw /dev/raw/raw12 oracle_vg/lvol1    # test db -- UNDOTBS1
/usr/bin/raw /dev/raw/raw13 oracle_vg/lvol2    # test db -- TEMP tablespace
/usr/bin/raw /dev/raw/raw14 oracle_vg/lvol3    # test db -- EXAMPLE tablespace
/usr/bin/raw /dev/raw/raw15 oracle_vg/lvol4    # test db -- USERS tablespace
/usr/bin/raw /dev/raw/raw16 oracle_vg/lvol5    # test db -- redo1_1.log
/usr/bin/raw /dev/raw/raw17 oracle_vg/lvol6    # test db -- redo1_2.log
/usr/bin/raw /dev/raw/raw18 oracle_vg/lvol7    # test db -- redo1_3.log
/usr/bin/raw /dev/raw/raw19 oracle_vg/lvol8    # test db -- control1
/usr/bin/raw /dev/raw/raw20 oracle_vg/lvol9    # test db -- control2
/usr/bin/raw /dev/raw/raw21 oracle_vg/lvol10    # test db -- control2
/usr/bin/raw /dev/raw/raw22 oracle_vg/lvol11    # test db -- spfile
/usr/bin/raw /dev/raw/raw23 oracle_vg/lvol12    # test db -- pwfile
/usr/bin/raw /dev/raw/raw24 oracle_vg/lvol13    # test db -- SYSTEM Tablespace
Also, you need to change the ownership of these devices to oracle user. Raw devices are refreshed with the default
permissions and ownership every time you reboot your system. For this reason, I add these lines to the /etc/rc.local so
that every time machine reboots, this devices are assigned correct ownership/permissionsPlease add the below lines
to the /etc/rc.local
permissions and ownership every time you reboot your system. For this reason, I add these lines to the /etc/rc.local so
that every time machine reboots, this devices are assigned correct ownership/permissionsPlease add the below lines
to the /etc/rc.local
for i in `seq 1 25`
do
chown oracle:dba /dev/raw/raw$i
chmod 600 /dev/raw/raw$i
done
do
chown oracle:dba /dev/raw/raw$i
chmod 600 /dev/raw/raw$i
done
Creating Required directories:
Create a database file subdirectory under the Oracle base directory and set the appropriate owner, group and permissions on it.
Create a database file subdirectory under the Oracle base directory and set the appropriate owner, group and permissions on it.
[oracle@shree ~]$ mkdir -p $ORACLE_BASE/oradata/test
[oracle@shree ~]$ chown -R orcale:oinstall $ORACLE_BASE/oradata
[oracle@shree ~]$ chmod -R 755 $ORACLE_BASE/oradata
[oracle@shree ~]$ cd $ORACLE_BASE/oradata/test
[oracle@shree ~]$ chown -R orcale:oinstall $ORACLE_BASE/oradata
[oracle@shree ~]$ chmod -R 755 $ORACLE_BASE/oradata
[oracle@shree ~]$ cd $ORACLE_BASE/oradata/test
Creating config file:
Create the test_raw.conf file under $ORACLE_BASE/oradata/test directory and add the below lines in it. This file is required by dbca when you
create the data using that. Manual method of creating database does not require this file.
Create the test_raw.conf file under $ORACLE_BASE/oradata/test directory and add the below lines in it. This file is required by dbca when you
create the data using that. Manual method of creating database does not require this file.
system=/dev/raw/raw24
sysaux=/dev/raw/raw11
undotbs1=/dev/raw/raw12
temp=/dev/raw/raw13
example=/dev/raw/raw14
users=/dev/raw/raw15
redo1_1=/dev/raw/raw16
redo1_2=/dev/raw/raw17
redo1_3=/dev/raw/raw18
control1=/dev/raw/raw19
control2=/dev/raw/raw20
control3=/dev/raw/raw21
spfile=/dev/raw/raw22
pwdfile=/dev/raw/raw23
Linking raw devices: -- This is an OPTIONAL STEP
Optionally, You can create the softlink to the raw devices (e.g /dev/raw/raw10) to make this file recognize easily.
With the softlink created, file name as well as size can easily be guessed by looking at the link itself. Follow the
below steps to create the softlink and use them instead of device name.
[oracle@shree ~]$ ln -s /dev/raw/raw11 $ORACLE_BASE/oradata/test/test_sysaux_raw_520m[oracle@shree ~]$ ln -s /dev/raw/raw12 $ORACLE_BASE/oradata/test/test_undotbs1_raw_520m[oracle@shree ~]$ ln -s /dev/raw/raw13 $ORACLE_BASE/oradata/test/test_temp_raw_270m[oracle@shree ~]$ ln -s /dev/raw/raw14 $ORACLE_BASE/oradata/test/test_example_raw_170m[oracle@shree ~]$ ln -s /dev/raw/raw15 $ORACLE_BASE/oradata/test/test_users_raw_130m[oracle@shree ~]$ ln -s /dev/raw/raw16 $ORACLE_BASE/oradata/test/test_redo1_1_raw_130m[oracle@shree ~]$ ln -s /dev/raw/raw17 $ORACLE_BASE/oradata/test/test_redo1_2_raw_130m[oracle@shree ~]$ ln -s /dev/raw/raw18 $ORACLE_BASE/oradata/test/test_redo1_3_raw_130m[oracle@shree ~]$ ln -s /dev/raw/raw19 $ORACLE_BASE/oradata/test/test_control1_raw_130m[oracle@shree ~]$ ln -s /dev/raw/raw20 $ORACLE_BASE/oradata/test/test_control2_raw_130m[oracle@shree ~]$ ln -s /dev/raw/raw21 $ORACLE_BASE/oradata/test/test_control3_raw_130m[oracle@shree ~]$ ln -s /dev/raw/raw22 $ORACLE_BASE/oradata/test/test_spfile_raw_8m[oracle@shree ~]$ ln -s /dev/raw/raw23 $ORACLE_BASE/oradata/test/test_pwdfile_raw_8m[oracle@shree ~]$ ln -s /dev/raw/raw24 $ORACLE_BASE/oradata/test/test_system_raw_520m
Now create the test_raw.conf file under $ORACLE_BASE/oradata/test directory and add the below lines in it.
system=/u01/app/oradata/test/test_system_raw_520m
sysaux=/u01/app/oradata/test/test_sysaux_raw_520m
undotbs1=/u01/app/oradata/test/test_undotbs1_raw_520m
temp=/u01/app/oradata/test/test_temp_raw_270m
example=/u01/app/oradata/test/test_example_raw_170m
users=/u01/app/oradata/test/test_users_raw_130m
redo1_1=/u01/app/oradata/test/test_redo1_1_raw_130m
redo1_2=/u01/app/oradata/test/test_redo1_2_raw_130m
redo1_3=/u01/app/oradata/test/test_redo1_3_raw_130m
control1=/u01/app/oradata/test/test_control1_raw_130m
control2=/u01/app/oradata/test/test_control2_raw_130m
control3=/u01/app/oradata/test/test_control3_raw_130m
spfile=/u01/app/oradata/test/test_spfile_raw_8m
pwdfile=/u01/app/oradata/test/test_pwdfile_raw_8m
Connect as a oracle user andf update the .bash_profile file with the new variable DBCA_RAW_CONFIG added into this. Again, this parameter is required
if you create the database through dbca.
if you create the database through dbca.
The updated file should look like this:
#.bash_profile
# Get the aliases and functions
if [ -f ~/.bashrc ]; then
. ~/.bashrc
fi
# User specific environment and startup programs
PATH=$PATH:$HOME/bin
export PATH
unset USERNAME
export ORACLE_BASE=/u01/app
export ORACEL_SID=test
export DBCA_RAW_CONFIG=$ORACLE_BASE/oradata/test_raw.conf
export ORACLE_HOME=$ORACLE_BASE/oracle/product/10.2.0/db_1
export PATH=$PATH:$ORACLE_HOME/bin
export LD_LIBRARY_PATH=$ORACLE_HOME/lib
Creating Database Manually without using dbca:# Get the aliases and functions
if [ -f ~/.bashrc ]; then
. ~/.bashrc
fi
# User specific environment and startup programs
PATH=$PATH:$HOME/bin
export PATH
unset USERNAME
export ORACLE_BASE=/u01/app
export ORACEL_SID=test
export DBCA_RAW_CONFIG=$ORACLE_BASE/oradata/test_raw.conf
export ORACLE_HOME=$ORACLE_BASE/oracle/product/10.2.0/db_1
export PATH=$PATH:$ORACLE_HOME/bin
export LD_LIBRARY_PATH=$ORACLE_HOME/lib
Once you complete the former steps (except creating config file and creating links), you are ready to create database manually.
Please follow the below steps.
Please follow the below steps.
create the password file:
[oracle@shree ~]$ orapwd file=$ORACLE_HOME/dbs/orapwtest password=changeIt entries=5
Create required directories:
[oracle@shree ~]$ mkdir -p $ORACLE_BASE/admin/test
[oracle@shree ~]$ cd $ORACLE_BASE/admin/test
[oracle@shree test]$ mkdir bdump
[oracle@shree test]$ mkdir udump
[oracle@shree test]$ mkdir cdump
[oracle@shree test]$ mkdir pfile
[oracle@shree ~]$ cd $ORACLE_BASE/admin/test
[oracle@shree test]$ mkdir bdump
[oracle@shree test]$ mkdir udump
[oracle@shree test]$ mkdir cdump
[oracle@shree test]$ mkdir pfile
Create the inittest.ora file:
Using vi editor or any other editor you like, create the init+test.ora file under the $ORACLE_HOME/dbs
directory and add the below lines into this file.
directory and add the below lines into this file.
db_cache_size=88080384
java_pool_size=4194304
large_pool_size=4194304
shared_pool_size=67108864
streams_pool_size=0
audit_file_dest='/u01/app/admin/test/adump'
background_dump_dest='/u01/app/admin/test/bdump'
compatible='10.2.0.1.0'
control_files='/dev/raw/raw19','/dev/raw/raw20','/dev/raw/raw21'
core_dump_dest='/u01/app/admin/test/cdump'
db_block_size=8192
db_domain=''
db_file_multiblock_read_count=16
db_name='test'
db_recovery_file_dest='/u01/app/flash_recovery_area'
db_recovery_file_dest_size=2147483648
dispatchers='(PROTOCOL=TCP) (SERVICE=testXDB)'
job_queue_processes=10
open_cursors=300
pga_aggregate_target=16777216
processes=150
remote_login_passwordfile='EXCLUSIVE'
sga_target=167772160
undo_management='AUTO'
undo_tablespace='UNDOTBS1'
user_dump_dest='/u01/app/admin/test/udump'
Create spfiletest.ora and start the instance using that file:
[oracle@shree ~]$ export ORACLE_SID=test
[oracle@shree ~]$ sqlplus / as sysdba
[oracle@shree ~]$ sqlplus / as sysdba
SQL*Plus: Release 10.2.0.1.0 - Production on Thu Dec 8 22:06:29 2005
Copyright (c) 1982, 2005, Oracle. All rights reserved.
Connected to an idle instance.
SQL> create spfile from pfile;
File created.
Run the CREATE DATABASE command:
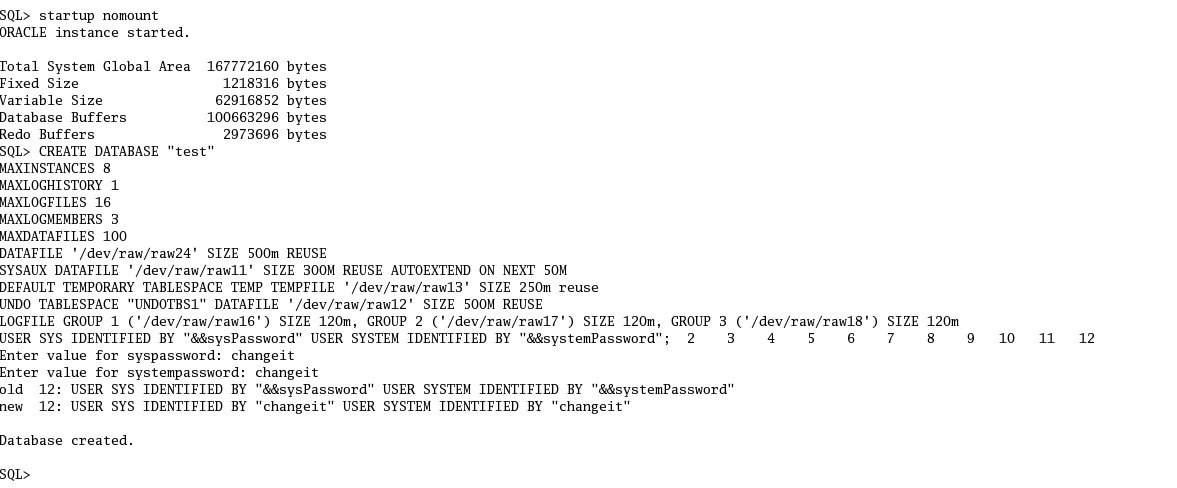
Now ruu the $ORACLE_HOME/rdbms/admin/catalog.sql and $ORACLE_HOME/rdbms/admin/catproc.sql.

Please follw these steps to crete the database using dbca that uses raw devices as storage options.
Quoted from "http://www.oracledba.org/10g/raw_dev/raw_dev_option.html"
0 comments:
Subscribe to:
Post Comments (Atom)